As an Amazon Associate, we earn from qualifying purchases. Some links may be affiliate links at no extra cost to you. Although our opinions are based on curated research, we haven't used these products. Articles generated with AI.
How Do I Repair A Torn Tent?
Repairing a torn tent can be a game-changer for your camping trip. First, assess the damage; is it a minor puncture or a gaping hole? For quick fixes, grab some duct tape or try fabric repair tape for a solid hold. For lasting repairs, clean the area, sew up rips, or use adhesive patches to seal the deal. Don’t forget to check those tent poles too! Got a tear? Stick around to uncover more tips for a seamless fix!
Key Takeaways
- Assess the damage to determine if it’s a minor puncture or a larger hole, noting any hidden issues nearby.
- Use duct tape or fabric repair tape for quick, temporary patches on rips or leaks.
- For permanent fixes, clean the area, then sew rips with nylon thread and reinforce with seam tape.
- Repair tent poles by aligning sections and using a pole repair sleeve or a tent stake as a splint.
- Regularly inspect and maintain your tent to prevent future damage, ensuring it’s clean and dry before storage.
Assessing the Damage
You may be interested


When a tent suffers a tear, it can feel like a tiny disaster in the great outdoors, especially if it happens during a camping trip. The first step is evaluating the damage, which involves damage categorization. Is it a minor puncture or a gaping hole? Next, check the surrounding fabric and seams for hidden issues, as the last thing anyone wants is a surprise leak in a storm. Environmental impact also plays a role; weather conditions or rough terrain could have caused that unfortunate tear. Don’t forget to document your findings with measurements and photos! This careful evaluation guarantees that repairs are effective and that you can continue enjoying the great outdoors without a hitch.
Quick Fixes for Temporary Repairs

Although a torn tent can feel like a camping catastrophe, quick fixes can turn that frown upside down before the stars come out. For those unexpected rips, duct tape emerges as a trusty sidekick, offering temporary patching with no special skills needed. Just slap it on—though be warned, it might leave a sticky souvenir! Alternatively, fabric repair tapes, like Tenacious Tape™, are a step up, providing strong adhesion when applied to clean, dry surfaces. If seams are leaking, seam sealers like Seam Grip can save the day, delivering a waterproof bond. And for broken poles? Makeshift splints, using tent stakes, can keep things upright. These adhesive solutions are perfect for a night under the stars, until a more permanent fix comes along! Additionally, understanding the importance of weather resistance features can help you choose a tent that minimizes the risk of damage during your outdoor adventures.

Conceal and protect knives and equipment with this self-clinging and adhesive-free camouflage wrap

Clean and condition expensive wetsuits, drysuits and other neoprene gear; washes away organic residue, chlorine and salt

Lightweight 8-liter roll-top dry bag is a classic, versatile dry storage and organizing option for backpacking, hiking, camping, sea kayaking, ski touring, cycling and travel
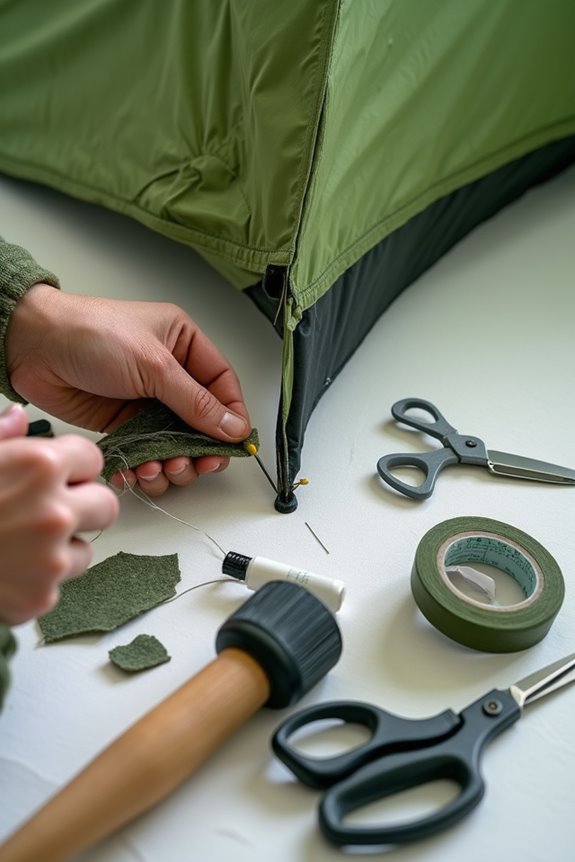
Permanent Repair Techniques

Temporary fixes can save the day when disaster strikes during a camping trip, but for those who want their tent to stand the test of time, permanent repair techniques are where the magic happens. Cleaning the area is key; dirt can ruin even the best adhesive patching efforts. For rips, sewing with nylon thread and reinforcing with seam tape creates a sturdy hold. Adhesive patches, either nylon or polyester, provide a lasting fix, while fabric glue offers a weatherproof bond. Don’t forget seam sealing! Applying seam sealer guarantees that the repaired areas remain waterproof. With the right tools and techniques, like Tenacious Tape and proper maintenance, campers can keep their tents ready for many adventures ahead, rain or shine!

Waterproof and Mudproof - 100% waterproof to protect all your gear from wet conditions. Holding up to 15 pounds, the 45L capacity dry bag will even float - it is a member of your camping accessories or a bug-out bag

HEROCLIP is the world's first 3-in-1 clip and hook that can hang just about anything, just about anywhere!

HEROCLIP is the world's first 3-in-1 clip and hook that can hang just about anything, just about anywhere!
Repairing Tent Poles

While enjoying the great outdoors, nothing can derail a camping trip quite like a broken tent pole. When faced with this dilemma, the first step is ensuring proper pole alignment; align those broken sections as straight as possible. Enter splint techniques: using a pole repair sleeve, which is a snug tube that fits over the damaged area, can save the day. Slide it over the break, bending any splayed ends if necessary. Secure the sleeve with duct tape for stability. If you’re in a pinch without a sleeve, a tent stake can work as a makeshift splint. Just tape it firmly around the break, and you’re back in business, ready to enjoy the stars without a leaky tent!
【Large-capacity Bag】Extended design, up to 35 centimeters/13.8 inches in length. Not only to storage the camping tent stakes, but also the other camping accessories you want to bring.

Anodized surface: Tent pole has anodizing process on the surface, making it smooth, not easy to fade and resistant
Tools and Materials Needed

When it comes to fixing a torn tent, having the right tools and materials on hand can make all the difference between a relaxing night under the stars and a frustrating battle with fabric. Essential items include repair kits, like Tear Mender for instant fixes or Tenacious Tape for a no-mess approach. Scissors are a must for cutting patches, while a sewing repair kit can help stitch up larger tears. For those who prefer adhesive options, options like HH-66 Vinyl Cement work wonders on laminated materials. Don’t forget safety pins for quick fixes and nylon cord for securing patches. With these handy tools, a little tear can quickly turn into a minor inconvenience rather than a camping catastrophe.
Preventive Measures for Tent Maintenance
Investing a little time in tent maintenance can save campers from the heartbreak of waking up to a leaky roof or a torn canopy on their next adventure. Regularly checking the tent for wear and tear is vital; a small tear today can become a big problem tomorrow. When it comes to tent cleaning, gentle hand washing with mild cleaners preserves the fabric and its waterproof coating. Avoid harsh chemicals that could ruin those essential layers. After each trip, make sure the tent is completely dry before storing it in a breathable bag, as moisture can lead to mildew. Additionally, ensuring that your tent material has a high waterproof rating will provide extra peace of mind against leaks during unexpected rain. By keeping an eye on these details, campers can enjoy more nights under the stars without worrying about unexpected leaks or tears.
Tips for Effective Repairs
Effective tent repairs can make all the difference between a successful camping trip and a soggy disaster. When tackling those pesky tears, choosing the right repair tape options is essential; Tenacious Tape or similar products work wonders with their strong adhesive and waterproof qualities. Before patch application, remember to clean the damaged area thoroughly—nobody wants dirt ruining their repairs! Once clean, cut your patch to extend at least an inch beyond the tear, rounding the corners to prevent peeling. For high-tension spots, consider reinforcing with an interior patch. Press down firmly, using body heat to activate the adhesive. Finally, allow your repairs to cure for 24 hours before packing up your tent, ensuring they hold strong against the elements!
When to Seek Professional Help
How can a camping enthusiast tell when it’s time to call in the pros for tent repairs? If the damage includes large holes or long rips, DIY fixes might not cut it. For those pesky zippers that refuse to work or mesh bug netting torn beyond adhesive help, repair specialists are the way to go. When tent poles are snapped or bent, it’s best to let the experts handle the structural repairs. Sure, repair costs usually range from $30 to $50, but that’s a small price to pay for a tent that withstands the elements. Additionally, if the tent’s integrity is compromised due to gear loft compatibility, don’t hesitate—seek professional help and keep your adventures going strong!
Frequently Asked Questions
Can I Use Regular Tape for Tent Repairs?
Using regular tape for tent repairs is not advisable. Tent repair materials designed for outdoor use offer superior adhesive options, ensuring durability and waterproofing, unlike standard tape that quickly degrades under harsh environmental conditions.
How Do I Store My Tent After Repairs?
After repairs, proper tent storage involves ensuring it is clean and completely dry. Maintain good air circulation, avoid tight compression, and check storage conditions regularly to preserve repair maintenance and tent longevity.
What Types of Tents Are Easiest to Repair?
Pop-up tents and canvas tents boast straightforward structures, simplifying repairs considerably. Their fewer components and accessible materials make them prime choices for quick fixes, allowing outdoor enthusiasts to enjoy seamless adventures without the hassle of complicated repairs.
Can I Waterproof My Tent After Repairing It?
Waterproofing a tent after repairs is vital. Effective techniques include applying seam sealer and waterproof sprays. Regular tent maintenance guarantees longevity and prevents water damage, particularly following repairs to maintain the tent’s protective qualities.
How Often Should I Inspect My Tent?
Amidst rustling leaves and the soft whisper of wind, tent maintenance requires careful attention. Inspection frequency should be at least twice for prolonged setups, ensuring safety and structural integrity before each use, like a guardian watching over shelter.